Organization guide¶
For organization admins and managers — the people who set up their team, run campaigns, manage the people being inspected, and keep the account compliant. This is the most complete guide; if you only read one, read this.
Contents¶
- Getting oriented
- Members & roles
- Operators & schedules
- GDPR & compliance
- Campaign management
- Beneficiary management
- Contact management
- Address management
- Direct control (live inspection sessions)
1. Getting oriented¶
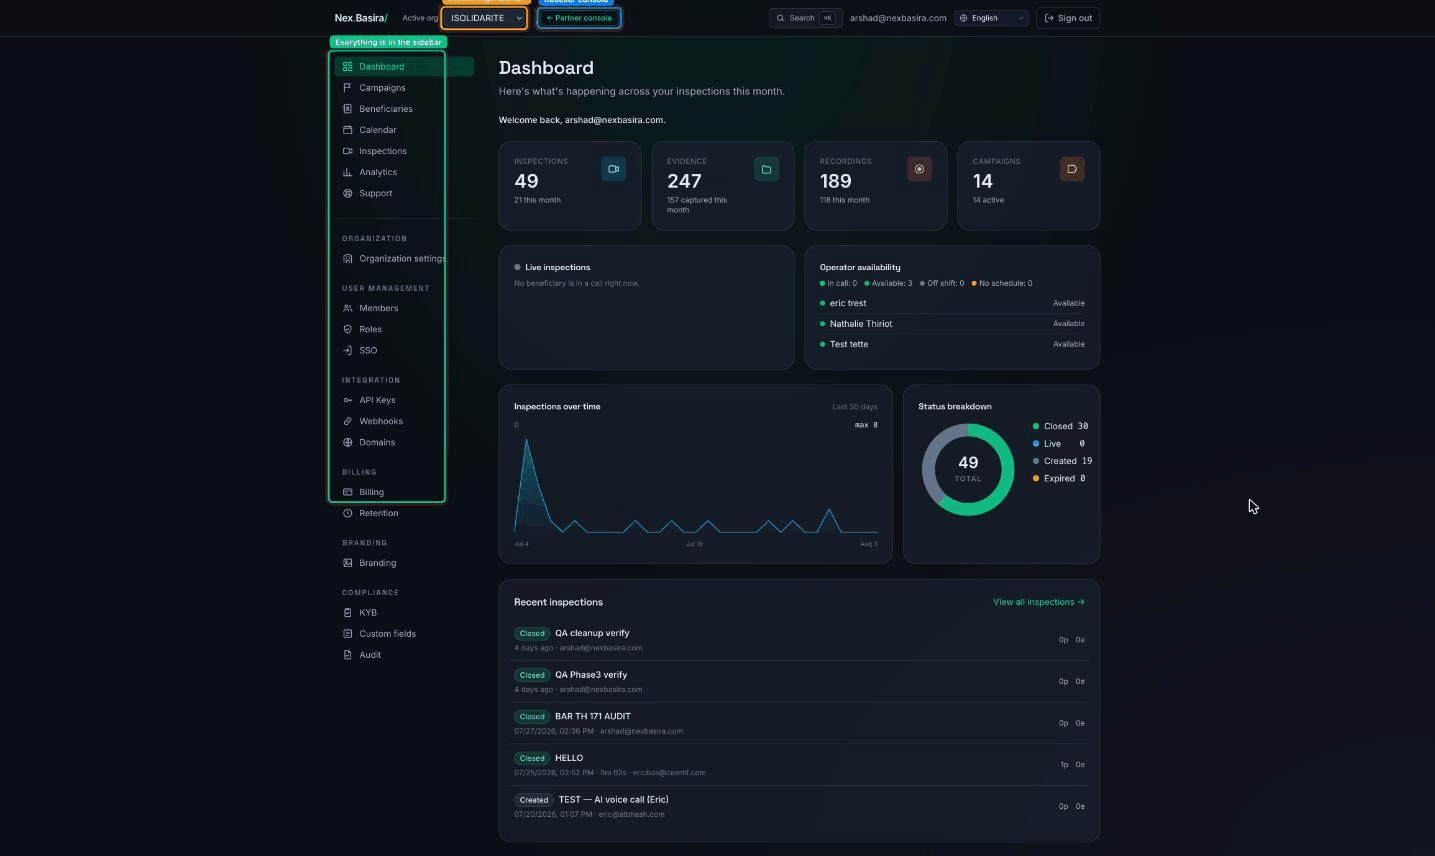
Everything lives behind the left sidebar. The top bar has three things that matter every day:
- Active org — if you belong to more than one organization, switch here. Everything you see (members, campaigns, beneficiaries) is scoped to the selected org.
- Search (⌘K) — jump to any campaign, beneficiary, or contact.
- Partner console — only visible to resellers; see the Reseller guide.
The sidebar groups features: Organization (settings), User management (Members, Roles, SSO), Integration (API keys, Webhooks, Domains), Billing, Branding, and Compliance (KYB, Custom fields, Audit).
2. Members & roles¶
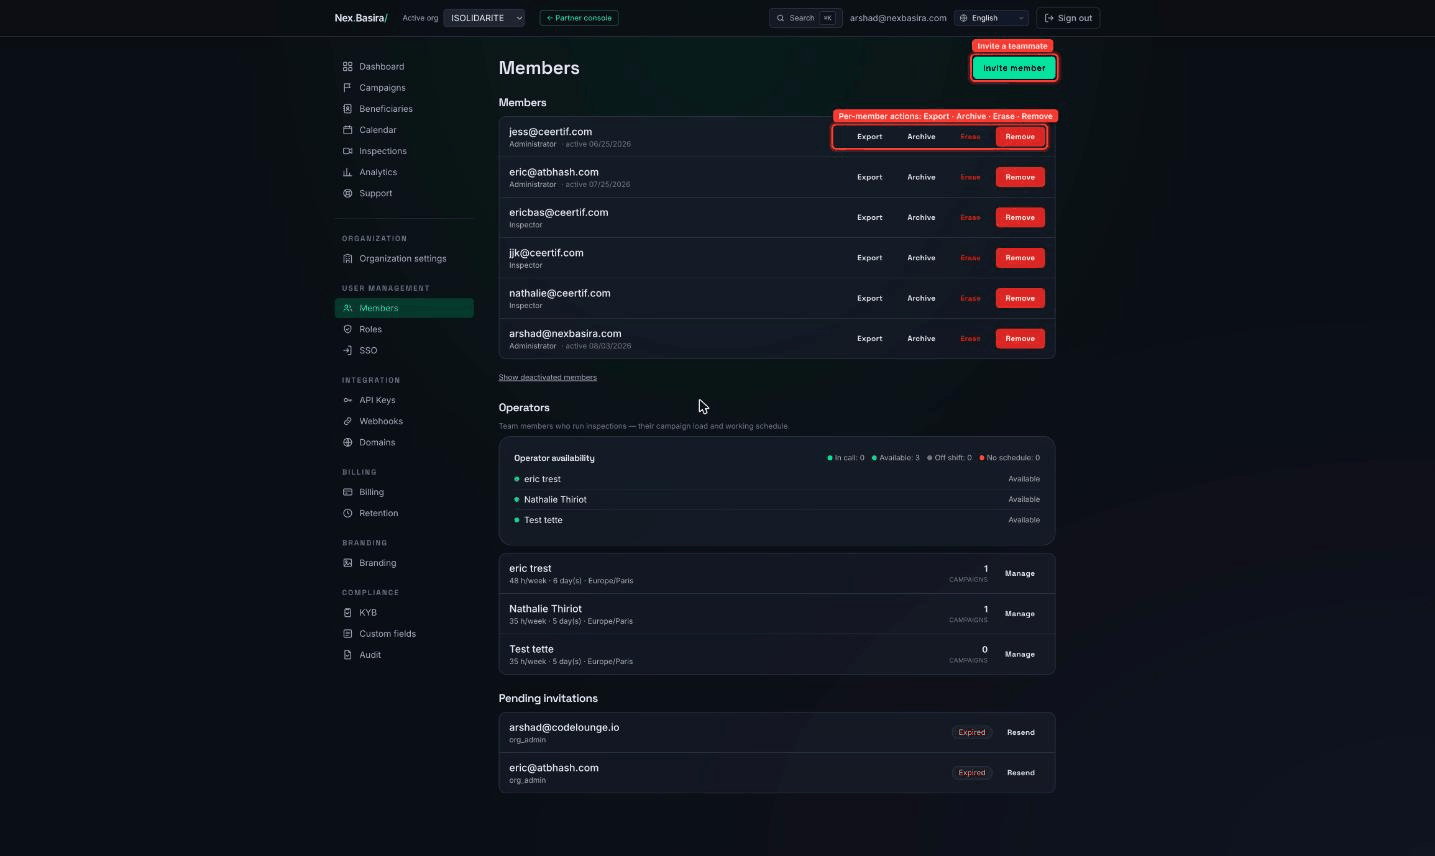
Members are the people who can log into your organization. Open User management → Members.
Roles at a glance¶
Each member has a role that controls what they can do. The built-in roles:
| Role | Can do |
|---|---|
| Administrator | Everything — team, billing, campaigns, compliance. |
| Manager | Run campaigns and beneficiaries; no billing/admin. |
| Operator / Inspector | Run the live inspections assigned to them; no admin. |
| Supervisor | Read-only, org-wide (dashboards & analytics across all operators). |
| Billing | Billing and invoices only. |
| Observer | Read-only. |
Roles are managed under User management → Roles, where you can also create custom roles by ticking exactly the permissions you want.
Inviting a member¶
- Click Invite member (top-right).
- Enter their email and pick a role.
- They receive an email invite → set a password → they're in.
Pending invites appear at the bottom of the page with a Resend button; an expired invite can be resent from there.
Managing an existing member¶
Each row has four actions:
- Export — download that member's activity/data.
- Archive — deactivate the member (they can't log in) but keep their history. Reversible via Show deactivated members → Restore.
- Erase — ⚠️ GDPR erasure of the person's personal data. Different from Archive: this is about the right to be forgotten, not just access. See GDPR & compliance.
- Remove — ⚠️ take the member out of the organization.
⚠️ Archive vs Erase vs Remove. Archive is the safe, reversible "turn off access" action. Remove takes them out of the org. Erase is the irreversible GDPR deletion of personal data — only use it for a genuine erasure request.
3. Operators & schedules¶
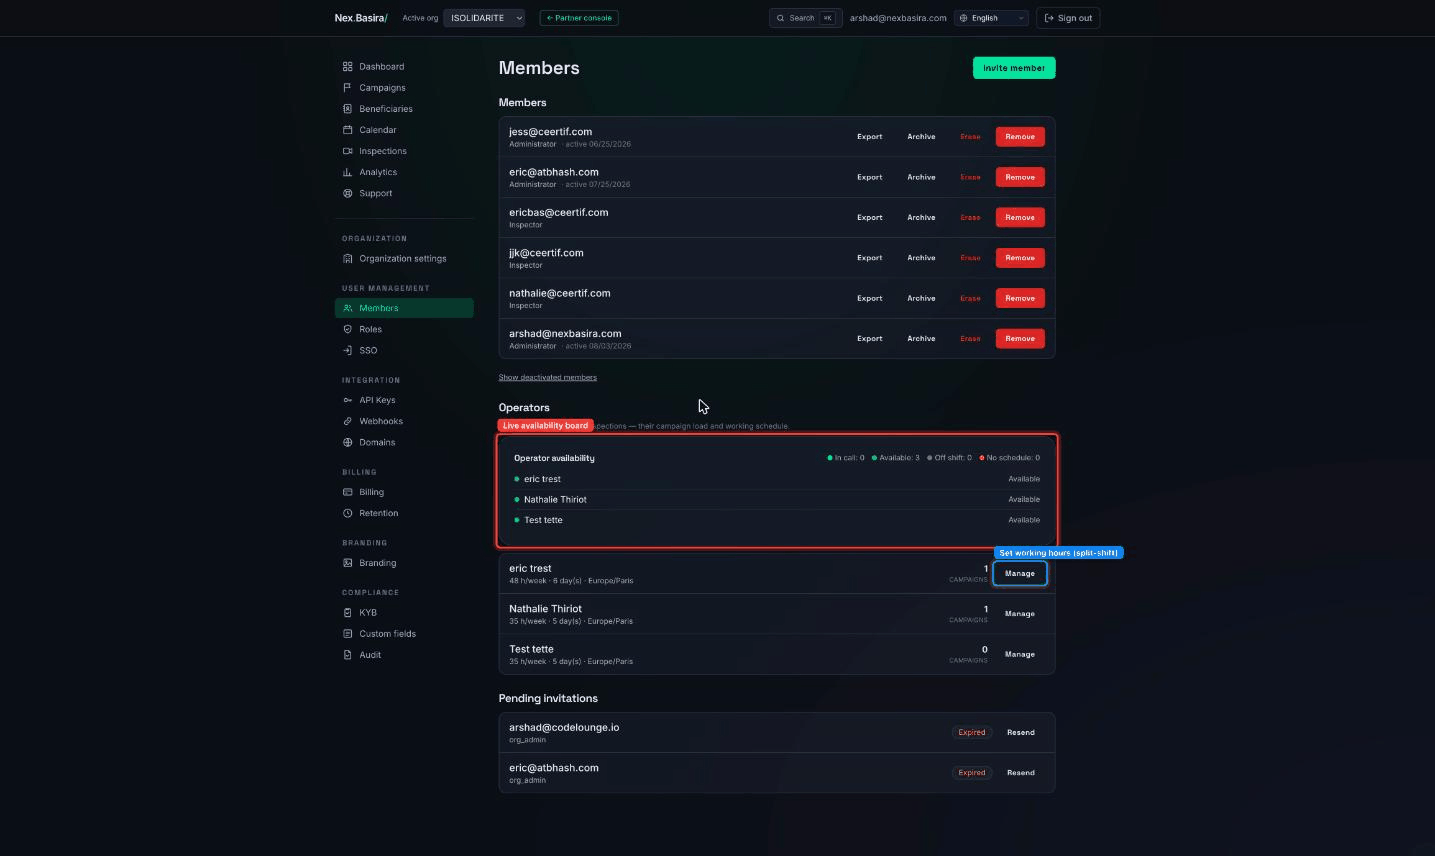
Operators are the members who actually run the video inspections. They show up in a dedicated block on the same Members page, below the member list.
Operator availability¶
The Operator availability panel is a live board:
- In call — currently in an inspection.
- Available — on shift and free.
- Off shift — outside their working hours.
- No schedule — no working hours set yet (they won't be given automatic work until a schedule exists).
Reading the operator rows¶
Under the availability board, each operator has a summary row:
48 h/week · 6 day(s) · Europe/Paris and a campaigns count — how many
campaigns they're assigned to. Click Manage to open that operator's
working schedule.
The working-schedule editor¶
The schedule editor sets an operator's weekly working hours in their own time zone. For each weekday you set:
- Whether the operator works that day.
- A first shift (e.g. 09:00–12:00), an optional break, and an optional second shift (e.g. 14:00–18:00) — the split-shift model, so lunch and part-time patterns are exact.
- All time fields are 24-hour (
14:00, not2:00 PM).
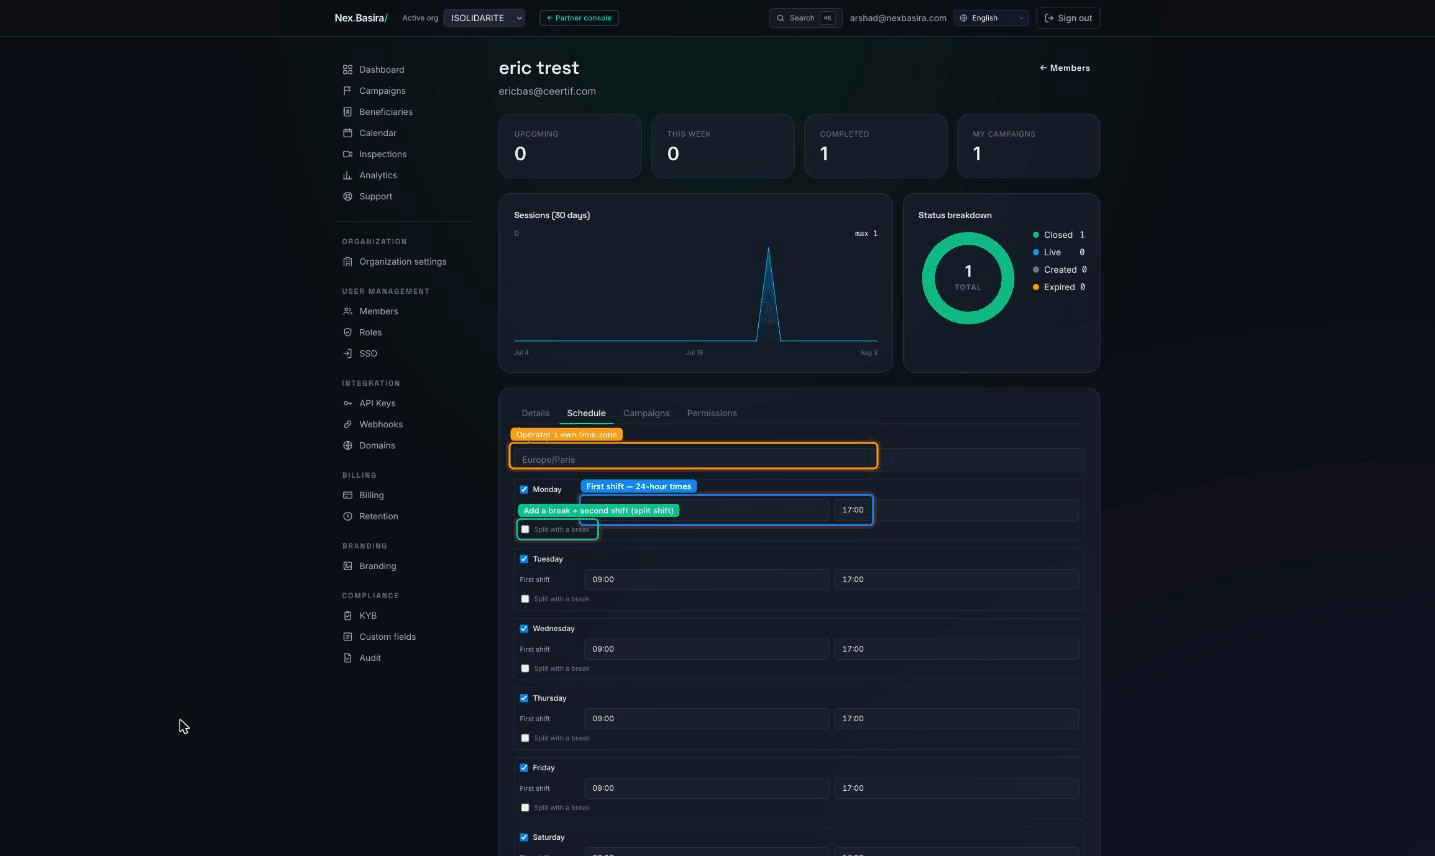
The schedule feeds two things: the availability board above, and the Smart Queue / booking wave, which only offers work to operators who are on shift and under capacity. An operator with No schedule is never auto-assigned — set their hours first.
Tip. Time zones are per-operator. A schedule of 09:00–18:00
Europe/Parisand 09:00–18:00Europe/Lisbonare one hour apart in real time — the platform handles the conversion; you just set each operator's local hours.
4. GDPR & compliance¶
NexBasira is built for regulated, evidence-grade inspections, so compliance is a first-class part of the product. Four tools, all in the Compliance and Billing sidebar groups.
The audit trail (Compliance → Audit)¶
Every inspection produces an append-only, hash-chained record of what happened, and each record is anchored — time-stamped with a qualified timestamp (eIDAS) and committed to a blockchain — so it can be proven tamper-free years later.
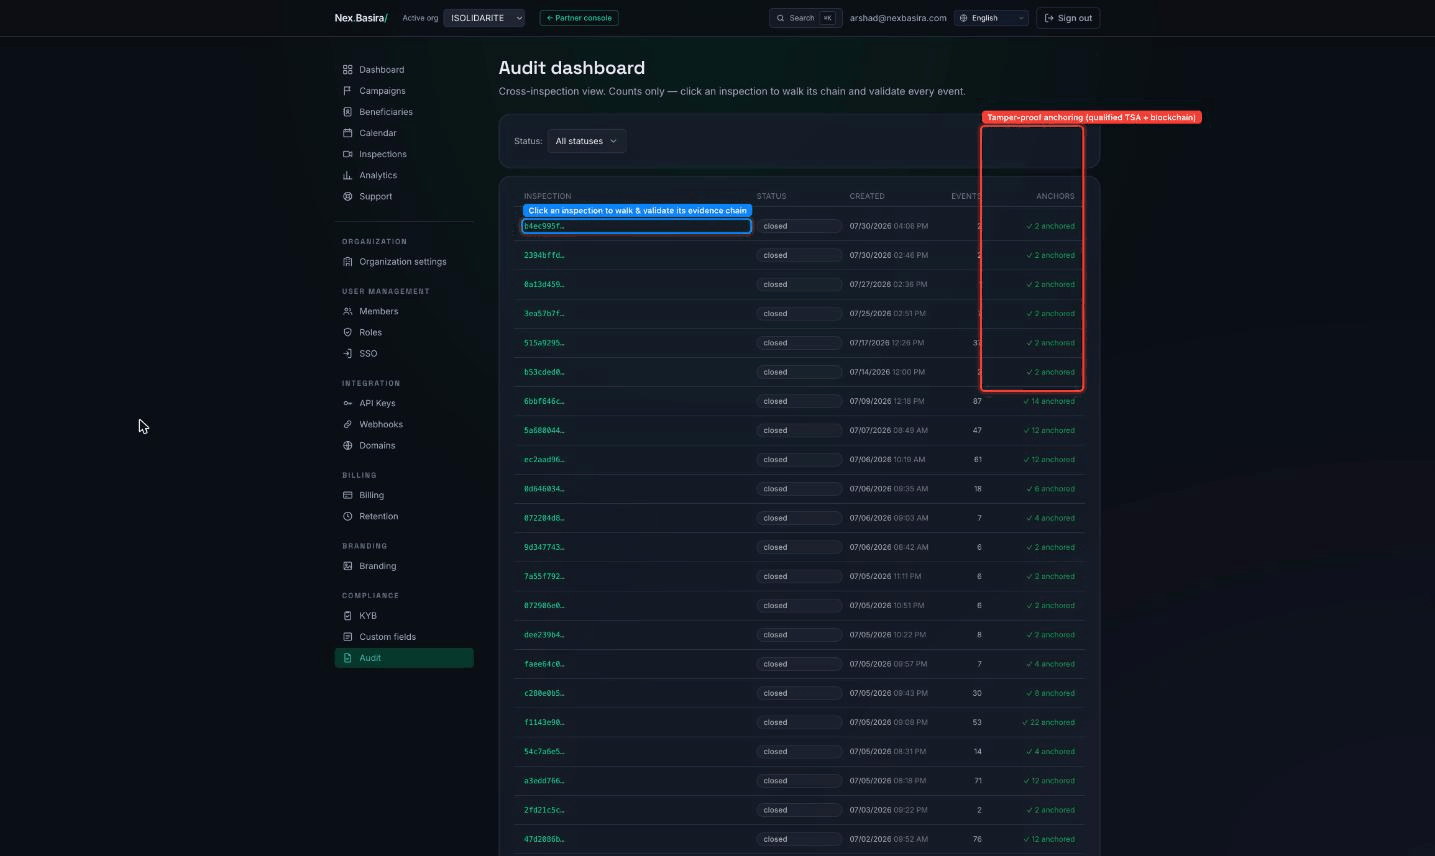
- The ANCHORS column shows
✓ N anchoredonce an inspection's evidence has been sealed. This is your proof of integrity. - Click any inspection id to open its audit chain and walk every event in order, validating each link — useful when a beneficiary, auditor, or regulator questions a file.
- Use the Status filter to narrow to open/closed inspections.
Data retention (Billing → Retention)¶
Set how long different kinds of data are kept before automatic clean-up (recordings, evidence, contact data). This is where you encode your legal retention policy so the platform enforces it for you rather than relying on manual deletion.
Right to erasure (GDPR)¶
When someone exercises their right to be forgotten, use Erase — available on a member row (Members) and on a contact (Contacts). Erase removes the person's personal data, as opposed to Archive (which only turns off access and keeps history).
⚠️ Erase is irreversible. It's specifically for genuine erasure requests. For "this person left the team", use Archive (reversible) instead.
Know Your Business (Compliance → KYB)¶
KYB verifies the businesses you inspect or onboard — EU VAT (VIES) validation, sanctions screening against official lists, and an attestation step. Run it from the KYB page and keep the result on file as part of your compliance evidence.
Note. KYB (verifying your customers) is separate from the Stripe merchant checks that verify your own organization for billing.
5. Campaign management¶
A campaign groups the people you need to inspect for one purpose (a batch of LED verifications, a water-consumption check, etc.) and drives how they're contacted and booked.
The campaigns list¶
Open Campaigns from the sidebar. Each card shows the campaign's dates, progress, and last activity; the tiles up top summarize totals.
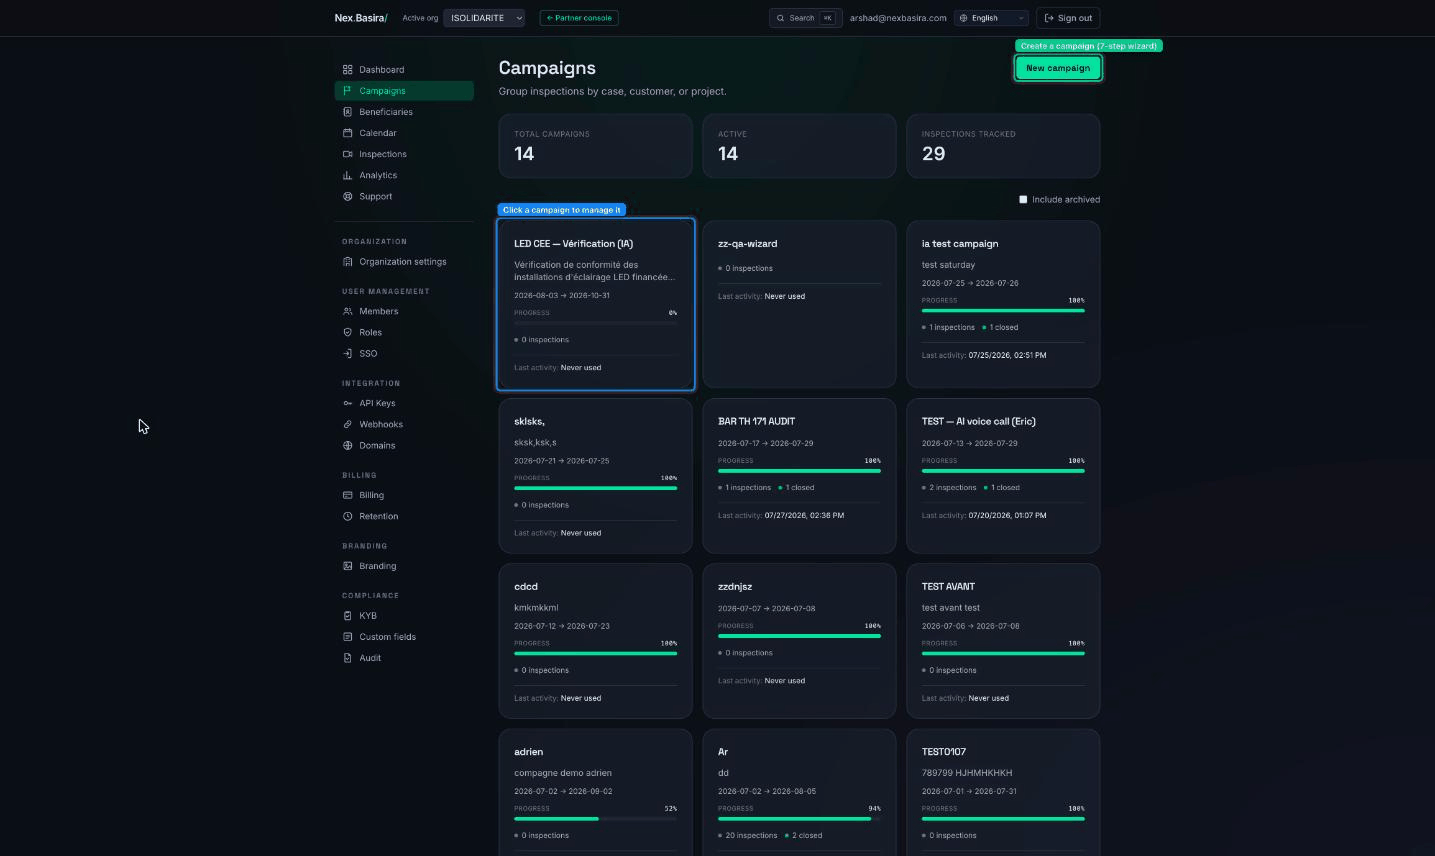
- New campaign (top-right) opens the setup wizard.
- Click any card to open that campaign.
- Tick Include archived to also show archived campaigns.
Creating a campaign — the setup wizard¶
The wizard walks you through, in order:
- Details — name, description, country, dates, time zone. This step also has the "AI-assisted campaign (Smart Queue)" checkbox: tick it to let the AI voice agent call and book beneficiaries automatically; leave it off for a manual campaign.
- Operators — who runs the inspections (leave empty = any inspector with access).
- Custom fields — extra per-beneficiary fields. Define these before importing beneficiaries: they become columns in the import template and variables the AI agent can use.
- Beneficiaries — add the people to inspect (import a spreadsheet or add inline). See Beneficiary management.
- Questions — a short questionnaire to collect during the inspection.
- Slot settings — the appointment rhythm (slot length, breaks).
- Templates — the invite/reminder/confirmation messages.
- Review — Activate the campaign.
You can Save as draft at any step and finish later.
Managing a campaign¶
The detail page has a tab per area, plus action buttons.
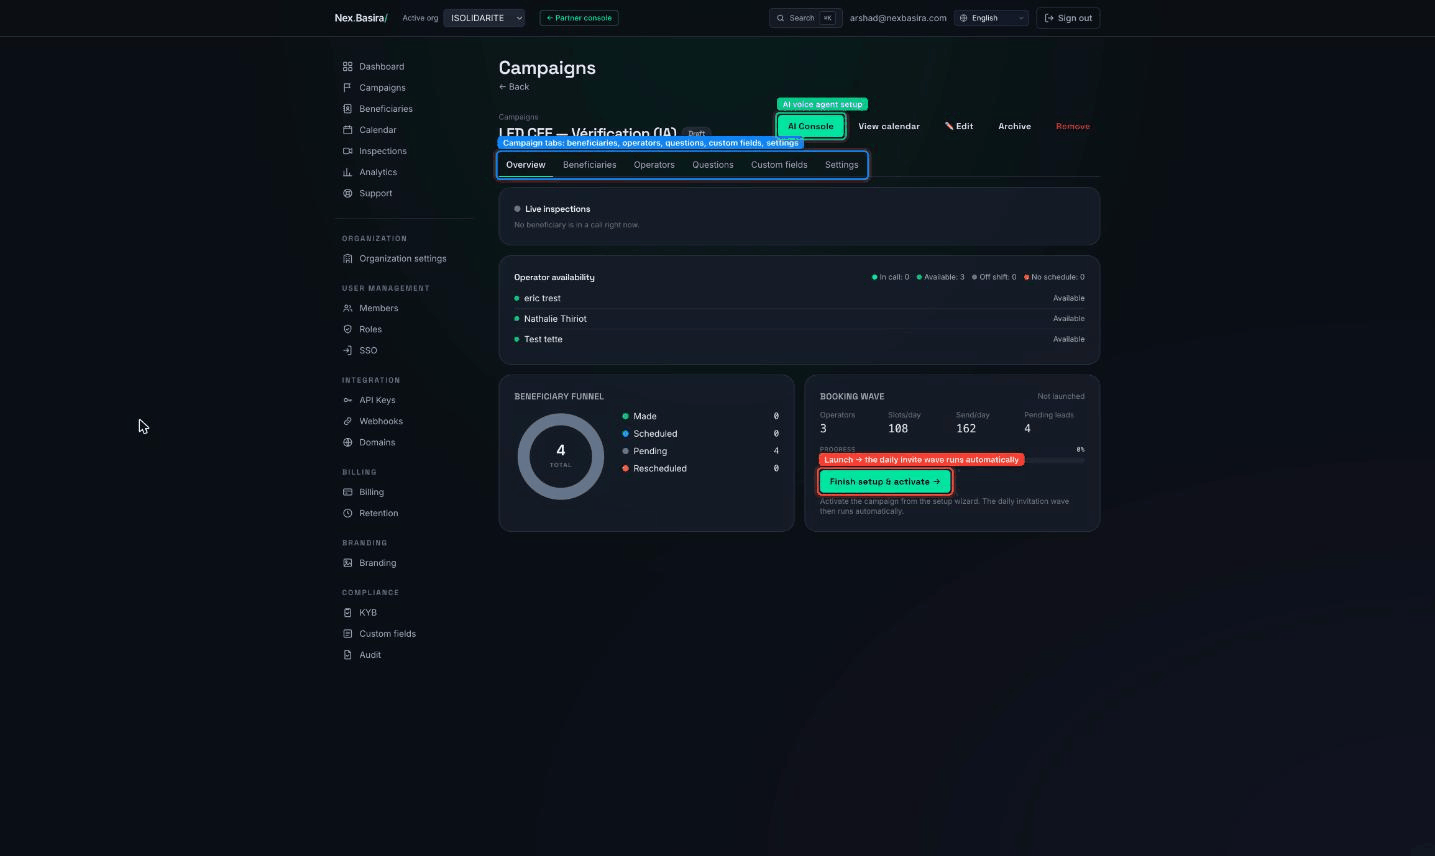
- Tabs: Overview (live funnel + booking wave), Beneficiaries, Operators, Questions, Custom fields, Settings.
- Actions: AI Console (voice-agent setup, AI campaigns only), View calendar, Edit (re-opens the wizard), Archive, Remove.
- Booking wave card shows operators, slots/day, sends/day, and pending leads.
Launching¶
- Manual campaign: hit Finish setup & activate (or Activate on the Review step). From then, the daily invitation wave runs automatically — each day it invites the next batch of beneficiaries to book. You can also push an extra batch now with Send a wave.
- AI campaign: open AI Console, configure the agent, then Enrol contacts. Enrolment seeds each contact's outreach sequence (intro SMS/email immediately, then AI calls on a cadence). ⚠️ Enrolling sends the first message right away, even while the campaign is a draft.
6. Beneficiary management¶
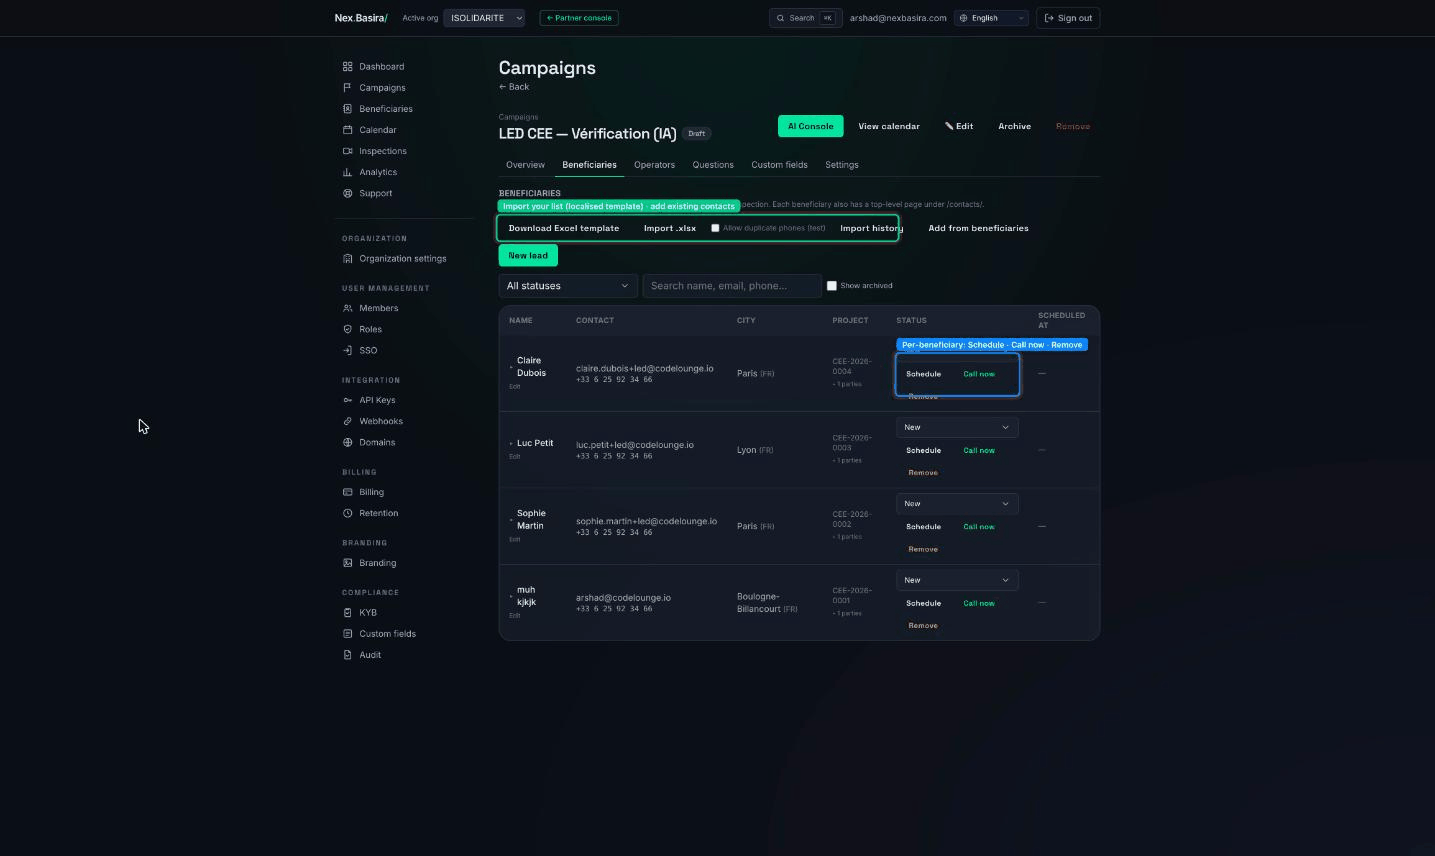
Beneficiaries are the people being inspected within a campaign. Each beneficiary is also a top-level Contact — the same person can be a beneficiary of several campaigns. Open a campaign → Beneficiaries tab.
Adding beneficiaries¶
Three ways:
- Download Excel template → fill → Import .xlsx. The template already
contains the right columns — including any campaign custom fields — and its
headers come out in the campaign's language (a French campaign gets
Prénom,Téléphone (E.164), …). Fill it, then Import .xlsx. Import runs in the background; Import history shows the result and any row errors. - ⚠️ Tick Allow duplicate phones (test) only for testing, when several rows share one real number.
- Add from beneficiaries — attach people who already exist as contacts in your org (no re-typing). Note: contacts attached this way start with empty custom fields — populate via import or the edit form.
- New lead — add one person inline.
Tip. Re-importing the same people with new custom-field values backfills those values onto the existing beneficiaries (matched by email/phone) — it won't create duplicates. Use this to fill fields you added after importing.
The list & statuses¶
Filter by status or search by name/email/phone; tick Show archived to include archived rows. Each row shows the person, city, project code, current status, and scheduled time.
A beneficiary moves through statuses as work progresses — e.g. New → Scheduled → (inspected) → closed — and Rescheduled, Cancelled, etc. as needed. The Overview tab's funnel summarizes these counts.
Per-beneficiary actions¶
- Schedule — book an inspection appointment (offers real open slots).
- Call now — ⚠️ start an inspection immediately (rings the operator / opens the live session now).
- Edit — fix the person's identity (name, email, phone, city). This updates the underlying contact across all campaigns.
- Remove — take them out of this campaign (archivable/reversible).
7. Contact management¶
A contact is a person in your organization's book. The same contact can be a beneficiary of several campaigns — the contact record survives across campaigns, while each campaign attempt lives under that campaign as a membership. Open Beneficiaries in the sidebar (this is your contacts book).
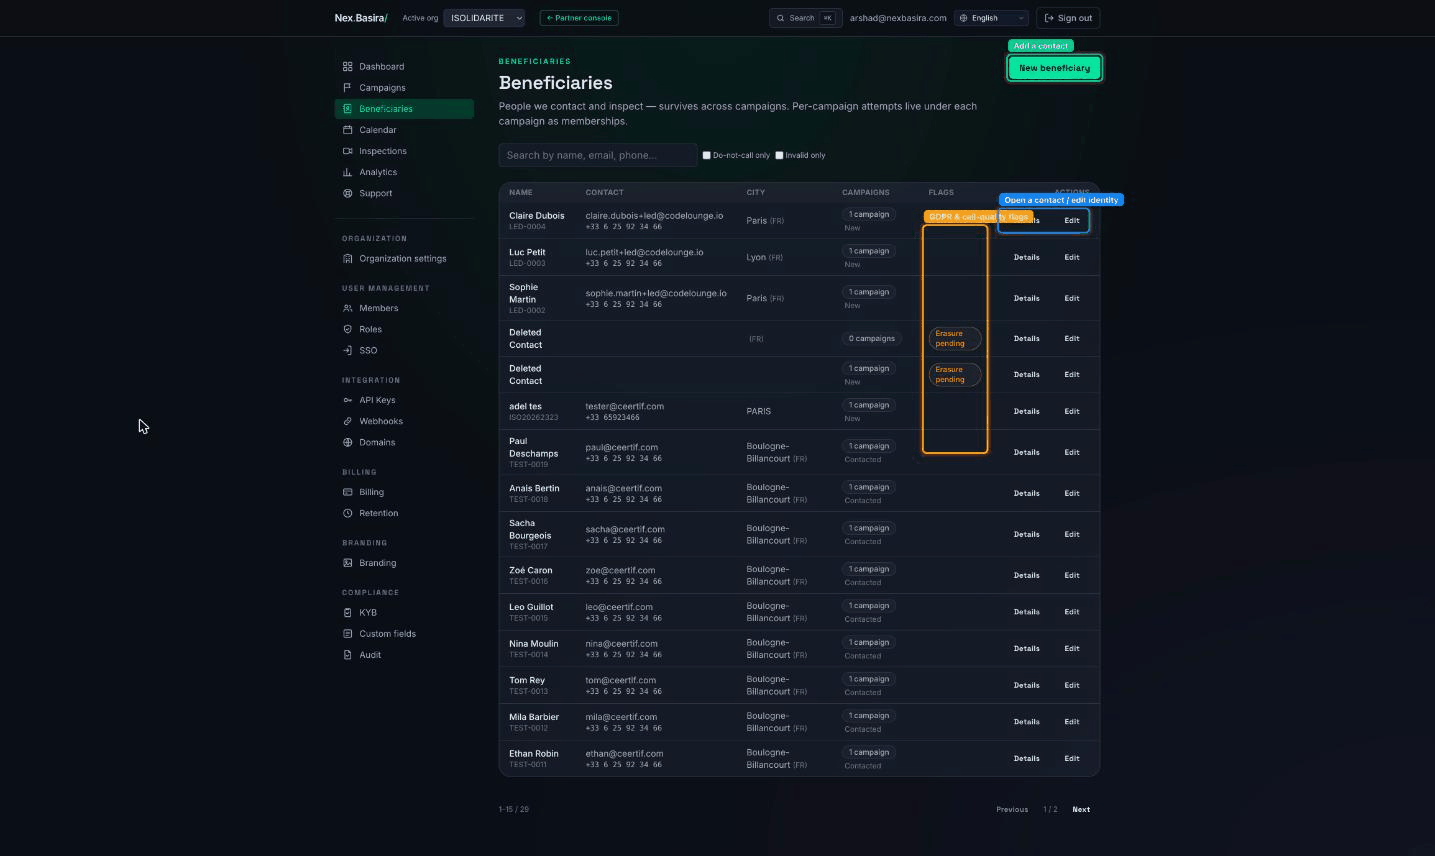
- Search by name, email, or phone; filter to Do-not-call only or Invalid only.
- The FLAGS column surfaces things like Erasure pending.
- Details opens the contact; Edit changes their identity; New beneficiary adds a person.
The contact detail¶
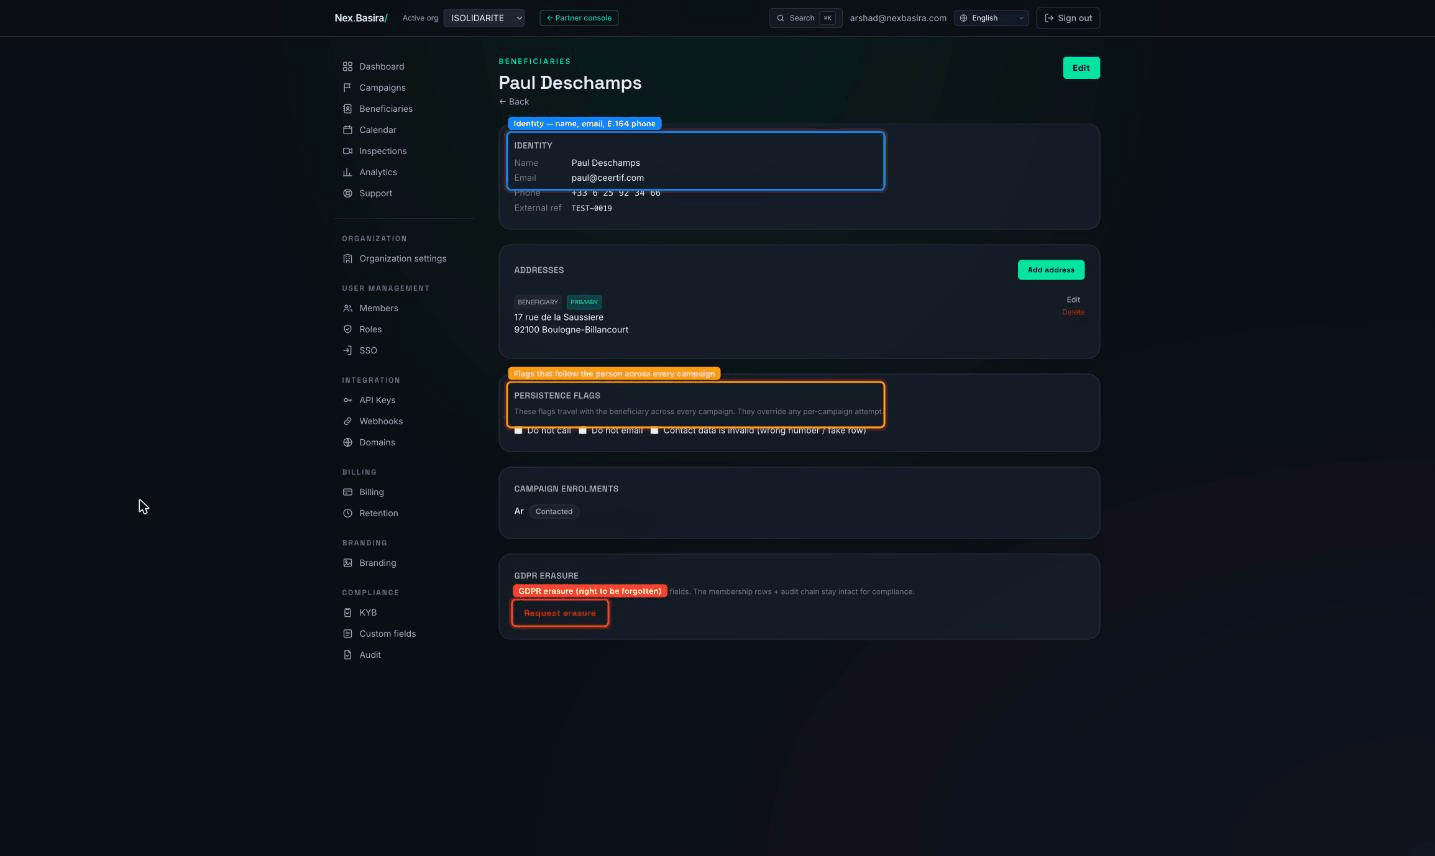
- Identity — name, email, phone in E.164 (
+33…), external reference. All phone numbers are stored and displayed in E.164 across the platform. - Persistence flags — Do not call, Do not email, Contact data is invalid. These follow the person across every campaign and override any per-campaign attempt, so setting Do not call here stops all outreach everywhere.
- Campaign enrolments — every campaign this person belongs to, with status.
- GDPR erasure — Request erasure triggers the data-subject-request worker to wipe identifying fields. ⚠️ The membership rows and the audit chain are deliberately kept (anonymized) so your compliance record stays intact.
8. Address management¶
Addresses are structured and are the source of truth for where an inspection takes place. Manage them from the Addresses block on the contact detail.
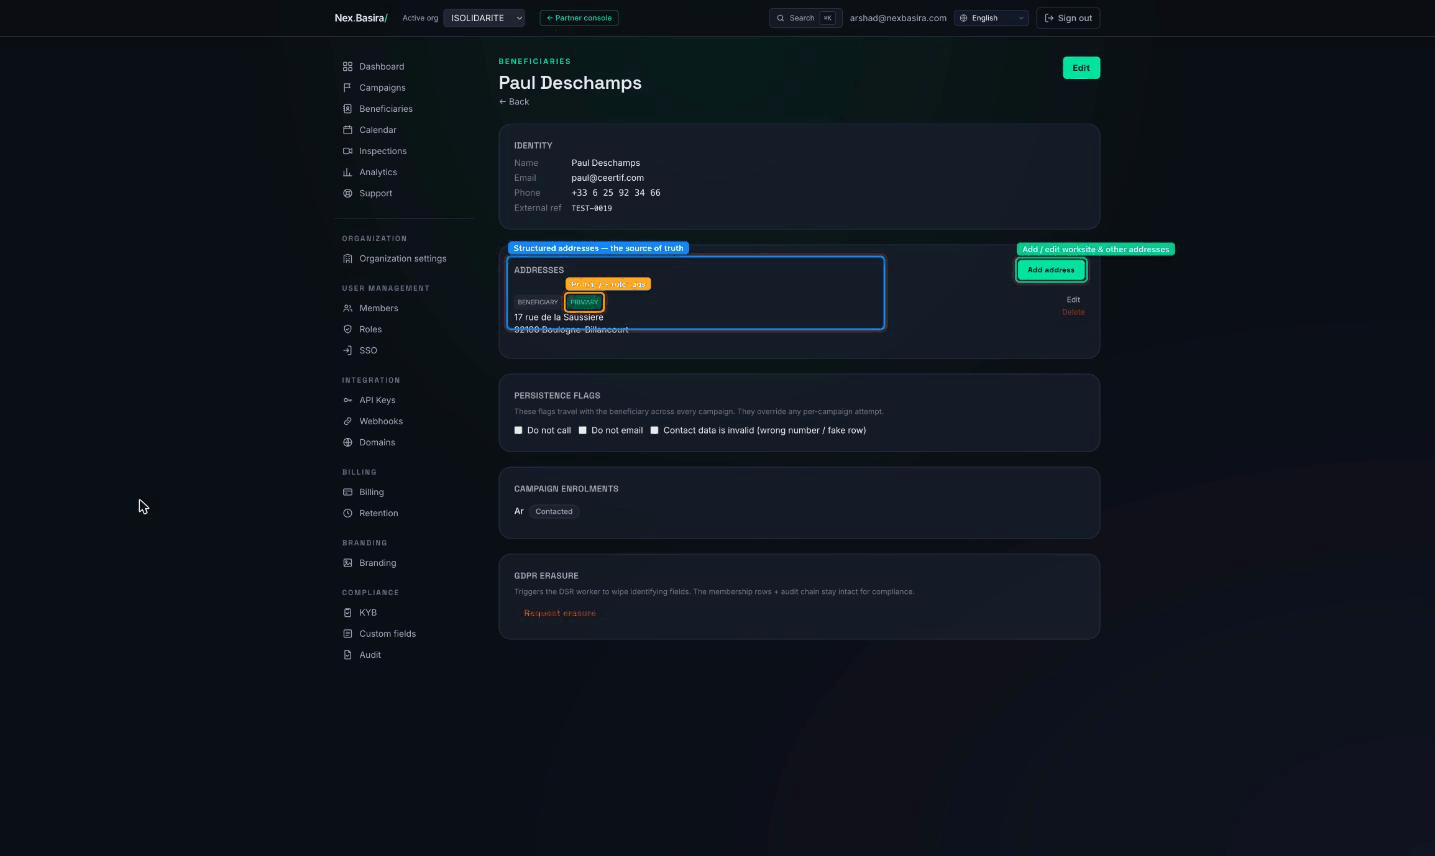
- Add address — add a worksite or other address; Edit/Delete manage existing ones.
- Each address carries tags: PRIMARY (the main one) and role tags such as BENEFICIARY, so the platform knows which address the inspection concerns.
- The worksite address drives the on-site checks — for example, the inspection report reverse-geocodes the GPS fix captured during the video call and cross-checks it against this address, flagging a mismatch if the person isn't where they should be.
Why structured, not a free-text line? Structured addresses let NexBasira map, geocode, and verify locations reliably. The flat address you may see on a quick create form is a mirror of this structured record.
9. Direct control (live inspection sessions)¶
The inspection is the heart of NexBasira: a short video call where the beneficiary shows their situation and an operator (controller) verifies it live while evidence is captured and sealed.
Starting an inspection¶
- Scheduled — the beneficiary booked a slot (via an invite or the AI agent); it starts at the appointed time.
- Now — from a campaign's Beneficiaries tab, Call now starts one immediately; Create inspection (on the Inspections page) does the same ad-hoc.
- A live presence board shows who has joined; you're alerted when a beneficiary arrives so an operator can pick them up right away.
Following inspections¶
Open Inspections in the sidebar. Filter by status and campaign; the status chips (Created → Open → Recording → Closed) track each one's lifecycle.
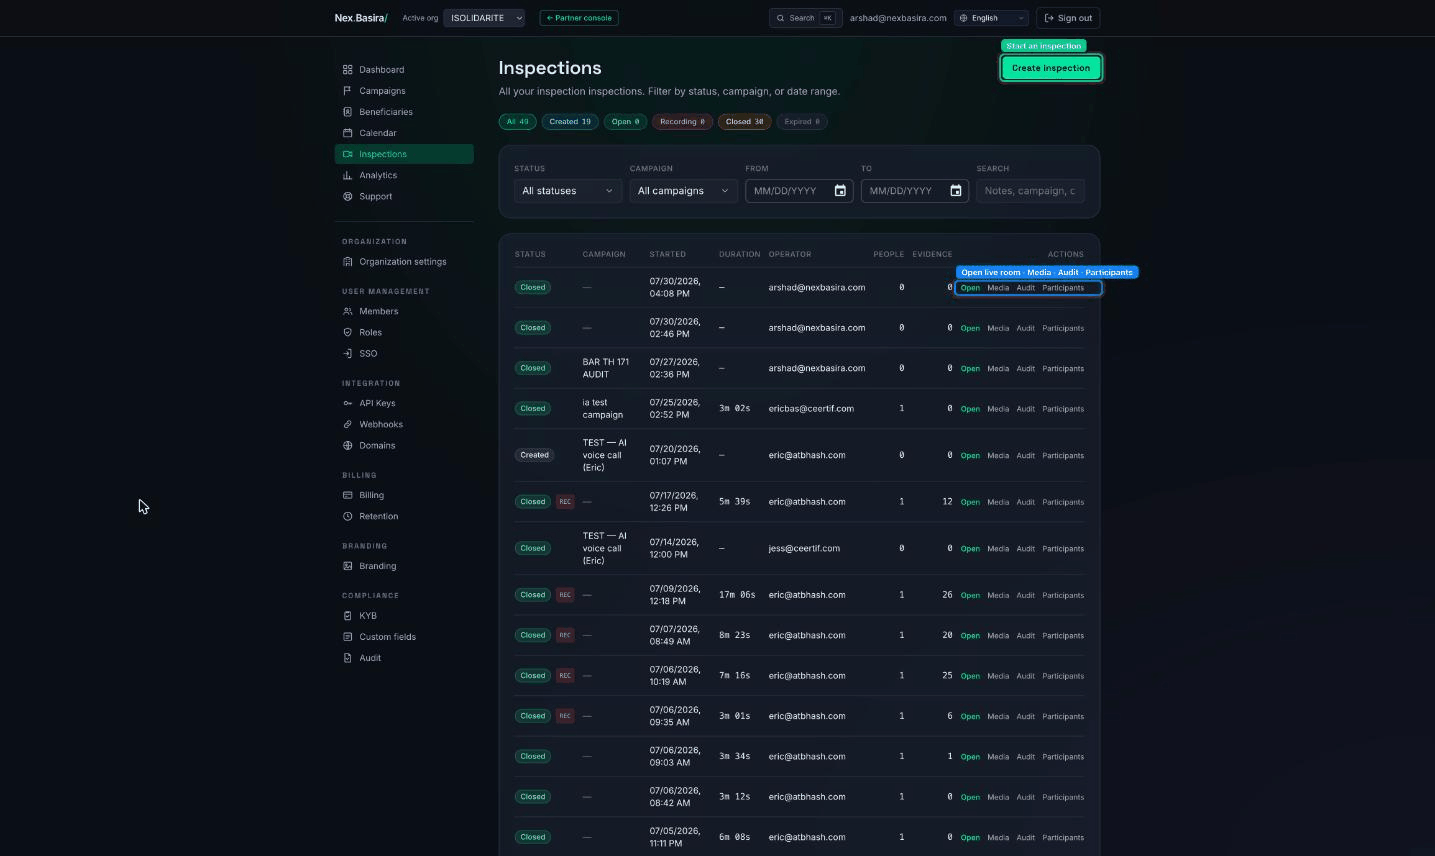
Each row's actions:
- Open — enter the live room (to run or observe the session).
- Media — the captured evidence + report (below).
- Audit — walk the tamper-proof evidence chain (see §4).
- Participants — who was in the call.
During the call¶
The operator drives a Meet-style room: live video, an in-session chat (the primary workspace), and evidence tools — snapshots, a whiteboard / annotator, and a full-call recording. Location (GPS) is captured for the report's on-site cross-check. A short Q&A can be collected too.
After the call — evidence & report¶
Everything captured lands on the inspection's Media / details page.
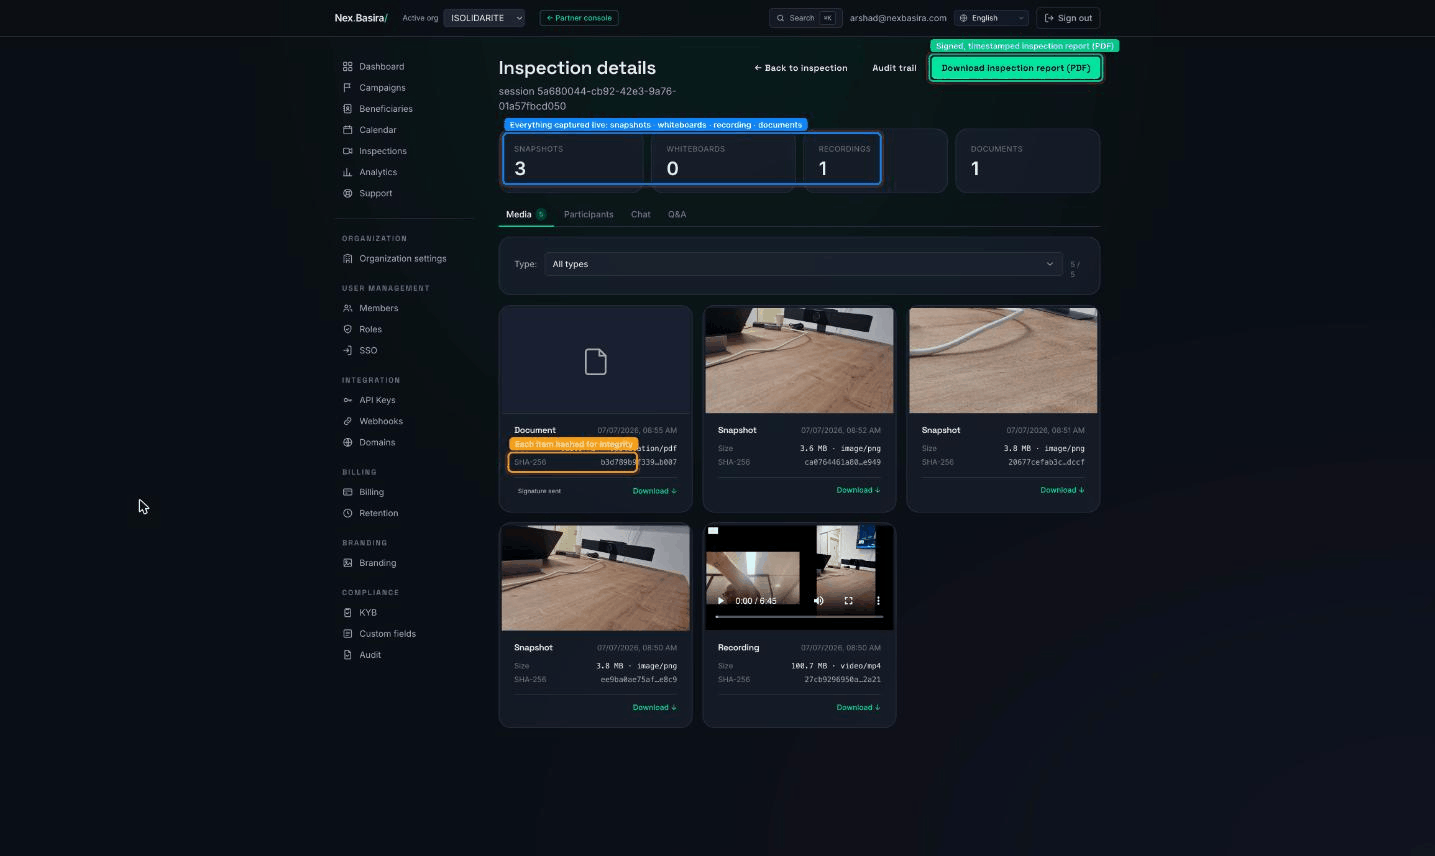
- Tiles summarize snapshots, whiteboards, recordings, documents; tabs switch between Media / Participants / Chat / Q&A.
- Every item shows its size and SHA-256 hash and can be downloaded.
- Download inspection report (PDF) produces the signed, timestamped report (available in every supported language). The Audit trail button walks the evidence chain.
This is what makes a NexBasira inspection evidence-grade: the beneficiary is verified live by a human, every artifact is hashed, and the whole thing is anchored (qualified timestamp + blockchain) so it can be proven authentic long after the call.
You've reached the end of the Organization guide. See also the Operator and Reseller guides.